
Bellows Made by Daniel Chiang-Chia-Lung
Written/ Edit/ Drawing/ Layout/ Design by Daniel Chiang-Chia-Lung
email: clc16888@yahoo.com.tw
Written/ Edit/ Drawing/ Layout/ Design by Daniel Chiang-Chia-Lung
email: clc16888@yahoo.com.tw
1. Push bellows back into the case, make it in minimun length.
 |
| From Bellows replacement |
2. At the back of the camera, take off the Ground Glass Back, place it aside.
 |
| From Bellows replacement |
3. Inside the back of the front standard, un-screw four screws. Now bellows should be easily separated with the front standard.
 |
| From Bellows replacement |
* Carefully keep these screws, better gather them with a magnet.
4. Turn Rotate Back 45 degree,
 |
| From Bellows replacement |
5. Un-screw four Screws with screwdriver.
 |
| From Bellows replacement |
6. Push the slider out half way.
 |
| From Bellows replacement |
7. Then separate the Rotate Back from camera, place it aside.
 |
| From Bellows replacement |
Now take out the Back Standard, and turn it making bellows facing up.
* Carefully not push the slider out too much, otherwise small spring plate insided will fall out.
8. Un-screw all the screws for latches and the back side of the bellows.
 |
| From Bellows replacement |
Now bellows should be able to separate from the Back Standard.
9. Cut the Front Panel from the old bellows with small knife.
Clean any lasting adhesive or bellows material on the Panel, with sandpaper or alcohol if necessary.
* If you want to make up paint scratches or chips on the panel, use matte black paint spray, or with a black Speedy Marker as well.
 |
| From Bellows replacement |
10. Make sure the panel is facing up (where inner circle has extruded edge )
With 5mm Double Sided Sticky Tape, stick two edges of the panel, cut them into bevel shape, but don’t tear off the upper waxed paper right now.
 |
| From Bellows replacement |
11. Place the Panel into the front side of the new bellows, carefull adjust the panel, makes four edges fit into the first fold of the bellows.
There should be a pair of the bellows edges were with ONE fold outside the panel, and another pair were with TWO folds, like the picture shows.
Take off the waxed papers on the Double Sided Sticky Tape, firmly stick the two side of bellows on the panel.
 |
| From Bellows replacement |
12. If the bellows is extended into the inner circle, cut them off with knife.
Unfold the other two edges of the bellows, With Double Sided Sticky Tape, stick the other two inner edges of the bellows.
Take off the waxed papers of the tape, and fold back, firmly stick on the panel.
 |
| From Bellows replacement |
13. Cut any part of bellows that extend into the inner-circle.
Finished front panel should looks like this.
 |
| From Bellows replacement |
14. Place the bellows into the Back Standard.
Be certain your Back Standard and bellows are all in the right direction.
* Back Standard’s top side is the egde where engraved with “West Germany” and “D.P.E.” * Bellows’ under side is where seam exists.
 |
| From Bellows replacement |
15. Place all four edge plates into the last fold of the bellows, which has black velvet layerd. Screw back all the screws.
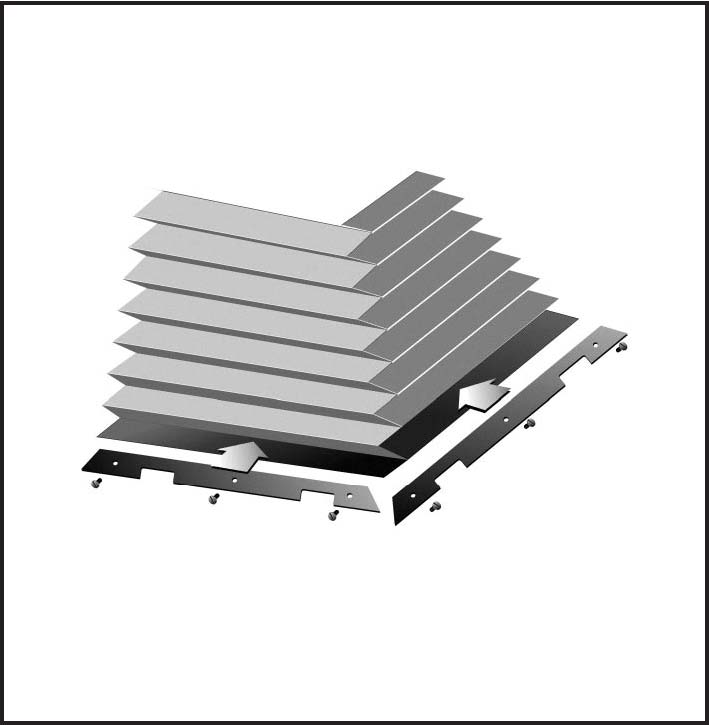 |
| From Bellows replacement |
16. Make sure all back edges of the bellows are well placed beneath the steel plate, check it while you screw. The situation on the right side of the bellows in picture should not happen.
 |
| From Bellows replacement |
17. Reverse the step 7, 6, 5, 4, 3, 2, then you now got a brand new bellows.
 |
| From Bellows replacement |
Any Questions? please don’t hesitate to ask, my email: clc16888@yahoo.com.tw
Enjoy it!
No comments:
Post a Comment