Tuesday, December 29, 2009

Storing Chamber

Just found out that I never post images of storing chamber, so here they are:
Shutter release and lens cloth can be stored in the chamber,  door closed tightly, controlled by a tiny screw just under the eye cup (a silver shinny one), can be adjusted if you feel it too tight or loose.

Monday, December 21, 2009

Emily has new covering and bellows

Emily with a Grafmatic film back, Looks nice and neat. But she needs a new lens board

Friday, December 11, 2009

Emily basic frame is ready

I decided to named my J66 WA 4x5 rangefolder "Emily".
The basic frame is ready
Accept lens in focal length 90mm and shorter, I hope to mount a 47mm lens to see how it looks like.
She will be a fixed lens WA 4x5, share the same back system with Byron, but need a new designed helical focus system.
Keep working on it. on her.


You know what? Comparing with the single plastic lens that J66 uses as taking lens, its rangefinder made in much better quality, really don't know what was Polaroid thinking when designing J66.

Saturday, December 5, 2009

Friday, December 4, 2009

3x4 instant film back (cont.)

(2013/11/17) By keep improving Byron design, now 3x4 instant film holders don't need any modification for Byron, thus what this post discussed are for record only, please refer here.


Blocked by left side teeth and blocking plate, I said that 3x4 Polaroid instant film hold could be used on Byron, but had to use 10 films every time, in my last blog.

Well, not true anymore.

That's ridiculous to force user to shoot 10 instant film every time.

So I tried to solve this problem. One guy in other forum asked about the similar question, his camera blocking the dark slide from inserting back, I suggested him to cut out the part that blocks, and then think maybe I can solve my problem in similar way.

But not to cut out something, thus, to replace something.

First, I have to mask the hole exposed by lathing last time I modified film holder. The work is simple, to glue a thin layer of black plastic on it, the result is satisfied, you wouldn't notice it modified already.
Secondary, to solve that dark slide can not insert back problem.
Use the same thin layer of plastic, made a dark slide same as original.
Since the slide is not so stiff, plastic dark slide now can be pulled out or inserted back anytime during the shooting.
Need a little bit of practice, then you can figure out the way to handle this flexible plastic dark slide.

The final problem, lock/unlock the holder cover, that will take me two days, to be continued.

(06/12 Add)
There are two design versions for holder cover lock. One by me, one by my little boy George, he is 7.

After two days tests and designs, I managed to utilize the holes on the cover, to make a rather "high tec" lock.


Replacing the lock handler with a steel rod through the holes, and fixed by e-rings, now the rod extruding a little bit, as two handles.
Then implant a spring steel loop each side, them lock the cover.
Looks nice, and feel good to use, I am proud about it, took me two days.

Then my kid George came asking me what I am doing, I explained to him and operated to show off, he listened and looked at me, in a weired expression :"that is a cover isn't it? just for lock and unlock, right?","yes." I replied.


Then he went away and back within ten seconds, showed me his solution.
A rubber band! I had to admit it, that is the best solution.

And took George 10 seconds.

Sunday, November 29, 2009

Covering the film chamber door

It is nothing to do with the function of the camera, or the quality of the optical performance, but only personal pursuit from good to excellence.

Prototype of the Byron I made, most of the images in my blog taken from it, no one ever criticized about this, a significant sign beneath the covering of the film chamber door.

Original  there was a big extruding switch for instant film process, for simplify the outlook, this useless switch was mill flat, and a thin layer of steel plate was pasted to block the hole left, thus the plate leaves its trace when covered by leatherette.

Yes, it is nothing to do with the functions, and no one ever said anything about it, but I myself feel very annoyed by this, like a big pimple on a beautiful girl's face.

Determined to take it off, what my plan is to implant the thin steel plate, leave no trace of it on cover.
Cut off the back door, leaving the part we need, then not only mill the extruding switch flat, we made a little deeper, a square ditch for the plate. Left one need to be cleaned of the glue that left.

With thin layer steel plate and AB glue for metal, the hole is covered.
But there are still some tiny rivet holes and gaps on the surface, so before covering, some places need to be puttyed, and sand to flat.
Well, it is easy to say, but all procedures took lots of time, but that worth it. the result show beautiful smooth surface.
Rejoin it to the camera, you can see that the covering shows its quality, no trace of the plate, keep outlook low profile and simple.
Keep improving it!

Monday, November 23, 2009

So much investment in the place you won't notice........

For making Byron an interchangeable lenses camera, many modifications need to be done. Bellows as example, is a must. None of other 110B conversions replace bellows as I do, besides simplified the jobs, I think that they don't provide lens interchanging ability is another reason.
Front standard need to be drilled into 48mm in dia.

To maximize the size that lens could be directly mounted on the front standard, I need to re-design the bellows, and the front plate of bellows, for those modern lenses always are big-rear element in size, compares to those vintage lenses, whose rear are tiny. Original bellows front plate has a diameter 36mm hole, just the size for #0 shutter thread, that is fine for those lenses with tiny rear element, like Ysarex 4.7/127. But when a modern lens is mounted, their rear element are bigger than 36mm, you need to screw off the rear, mount the shutter with front element, then screw back the rear, I call this in-direct lens mount.
Original bellow front plate hole is 36mm in dia.

Well, if I am not picky, or trying to keep the conversion simple, I can leave the bellows as it is, so I don't have to replace the bellows, and certainly no need to re-design the bellows front plate.
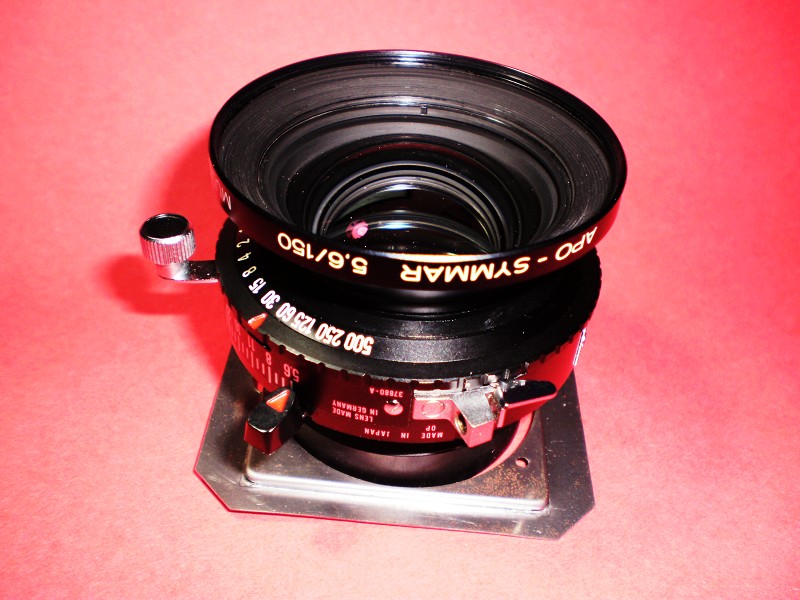
But it will be a pain in the ass for my clients, if they try to use any modern lenses. Apo Symmar 5.6/150, as example, got a 46mm in diameter on rear element, so each time a Byron owner use it, he needs to in-direct mount it on. Screw off the rear, mount, screw back......Just think that scenario, especially on street, or in field!! That drives me nut!


 new plate on top of the old one, 48mm vs. 36mm
48mm in diameter, this is the maximun size I can get from new design bellows and front plate, for a modern lens to directly mount on. only 12mm add, compare to it was, but at least some modern lenses can be directly mount on the front standard, and that is the limit I can push for Byron.
Apo Symmar 5.6/150 can directly mount by new plate.

I myself made bellows, so bellows won't be a problem, it is the bellows plate that bothers me! It is used to fix bellows front end to front standard.
A tiny steel plate, very thin, with some holes on it, that's it. But when I asked my mechanist to make some for me, they answered "NO"!
Why? it should be an easy and simple job, just cut into the plate and drill some holes, what's the big deal?
The big deal is, it is too thin for handmade, it can be made only by pressing machine, and pressing needs molds. All needs are three molds, not one.
And molds cost money.
If it is in economical scale, says we are going to produce 50,000 pieces, molds cost is nothing, easily share into each piece.
But what I need for this, 500 pieces the most, I doubt myself even if I can make 200 Byron in my whole life. So the cost for molds became expensive, and also to each plate.
To invest, or not to invest?
You know the answer, but you won't notice....it is just a tiny plate hide behind the front standard...

(24/11 Add...)
Then there are some particular screws, needed for Byron. Lens board needs two screws, the smaller one for fixing the lens, and the bigger one for locking the board, as you can see in the image below, the bigger one was later replaced by black ones outside the rim, considering the reflection of surface in bllows. They all are not industrial standard size, meaning? Special Order.
Not only lens board needs special screws, also does the sliding lock.
These screws are not hard to make, to the screw factory, actually they can make any screw just you draw it on the paper, the problem is the quantity.

Here are the conversations after I send the drawing to the factory, the salesman called me:
"Hi, I saw your drawing, would you tell me your company is?....."
"Well, I don't have a company, I just want to order some screws for my old camera."
"OK, no problem, how many screws do you want?"
"200."
"200 kilo gram?"
"No, 200 pieces"
click, the line is off.

Then I become smarter.
"Yes, I am in R&D department of my company, we need some screws for pilot run, you make 500 sample to me first!"
"We will made 500 pieces for you to test run, could you tell me the quantity for following order?"
click, I hung up the phone.


Factory told me, whenever they start the machine, at least 5000 screws made in first minute, so often they refer the quantity in weight, not pieces. Finally, I beg my friend who works in a famous computer company, as a mechanical engineer, use his connection to FORCE screw factory made these screw for me.

The cost? I'd rather not to think about it.

Byron is so accumulated by many un-noticeable improvements, bringing it into a 4x5 rangefolder of excellent, of my proud.

Wednesday, November 18, 2009

X'mas conversion is on the way

Hope to finish these conversions and send them home by Christmas. The left one is a J-66, for myself, to convert it into a wide angle 4x5 snap shooter, for 47, 58,and 65mm lens.

Monday, November 16, 2009

Three Tripod Sockets

In my own opinion, that a camera equipped with only one socket for tripod is a stupid idea for the purpose of mounting securely. One socket provides as a pivot for camera to rotate, only the friction that between the base and the quick release plate stops it from turning, so you have to screw it really really really tight, tight enough to leave scratches and scars on base, but still that doesn't guarantee camera from turning around, especially on heavier camera, like Linhof Technika IV I owned. I can't stop thinking why the designers in Linhof not awaring this problem, just one socket for this heavy brick?!! Do they field test the camera or not?
Maybe I am too picky, or think too much, but there are many quick release plates smartly designed with two supports, so camera will really securely sticked with the plate, there is no way you can rotate the camera, even if screwing not so tight.
This has to be accomplished by a matching camera base, with two sockets, one for screw, one for support. So I decide to make one more socket accompanied by the screw socket, that will bring us more secure support.
Remember to use the quick release plate with two supports!!
And then there is another similar situation, when you use a bracket or an accessory plate, one socket of such a long arm is not enough, one more socket for screw is necessary, so there I go, another 1/4 screw socket at side for it.
So Byron has three sockets on base, two as a pair, and another one for bracket.

I think those heavy cameras should all do the same design as well.
** There are enough new updates on Byron to release version 2 ""something you should know about Byron 4x5 rangefolder camera", but this time I would like to know who is interested in it, so please write to me for it, I will send it to you when released.

Sunday, November 15, 2009

Locking Clip For Front Standard

This is a design for a problem that other 110B conversion never touched, they don't provide lens interchangeable abilities.
110B front standard is designed for Ysarex 4.7/127mm lens only, it is tiny and lightweight, equipped with a powerful spring, it stands rigid when bellows pulled out for snaps, and fold flat while bellows pushed back and door closed.
I emphasize "rigid" because that depends, if the lens is a lightweight one, like Ysarex 4.7/127, Angulon 6.8/90, Symmar-S 5.6/100, Apo-Symmar 5.6/150, or Apo Ronar 9/150, weighted around 200g, that spring standard is "rigid".
But when 110B converted from a fixed lens into a lens interchangeable camera, it is possible for user to mount a much heavier lens on it, will the spring front standard hold it well?
This is the original front standard
With a lightweight lens like Symmar-S 5.6/100 (185g), standard support firmly keeps lens stand vertically, even we lean the standard forward, it bounce back right away.
But if we mount a Super Angulon 8/90 (363g), the spring is not able to keep standard vertical so firmly, if we lean the lens, the standard will not bounce back.
To solve this problem, months ago I tried to use two round plates as "Stop" to keep support from sliding, so standard wouldn't lean forward, it works, but awkward to operate, so it was abandoned.


Then I ask spring factory made locking clip for me, according to my design, there were several versions, finally I picked the one below in the image. Made in Dia. 2mm steel thread, very strong.
Locking clip set will hold the support extremely tight with the standard, keeps it at the vertical position without any movement. When you press the clip down, it  "click" locks the support, you know it is locked.
This clip is for heavy weight lenses, you don't need to use it when the lens is tiny and lightweight, but I think always locking the support is a good habit, since it is so easy to operate, why not?
When you finished snaps, want to fold up the camera, pull the clip up, it will hide under the shutter nicely, wouldn't bother any operation and storage.

Friday, November 13, 2009

Detachable Eyecup

For fun again!
A detachable eyecup, made in rubber, improve viewing contrast, the cup can be folded when not in use, or detached. And the cup can be rotated for right/left eye.
I mount a roll film back, the thickest one I have, eyecup perfectly help me to block out light noise around, more clear and contrast viewing!

Thursday, November 12, 2009

Ground Glass Panel

Just for fun, I decided to make a hood for my ground glass, but in my way.
I intended to make ground glass a separated part, since Byron is designed for snap shots, a ground glass is not a necessity, but occasionally when it is treated as a view camera, then you need a ground glass. Most of time I left it at home, when I knew today my Byron is a snappy, no chance for viewing.

It share the same size of a double sided dark slides, almost. Made in bakelite, following the ISO standard dimensions, equipped with Fresnel lens, this ground glass is bright in viewing.
It is for Graflok system, not only Byron, any view camera with Graflok system can install it, I put it on my Linhof Technika IV without any problem!
 
The hood, is in thin plastic sheet, matte black, I cut them as paper card, I used do package designs when in computer company, so to me it's like back to the old time.
When hood is folded up, it protects the surface of ground glass, also prevents dust or scratches of  lens. Maybe I should make a sleeve for it?