From now on, you can shoot with 8x10 or larger camera but no enlarger needed.
RC-based (resin-coated) positive reversal photographic paper containing the largest amount of silver in the industry that allows to create distinctive half-tones and rich dark tones.
Very high ISO-speed which corresponds to about 120 film ISO. High speed enables shorter exposures — no more long sitting in front of the camera!
No need for a negative, you can shoot directly on the paper. Adjusted reversal process. User-friendly.
Fixed grade: contrast.
Glossy embossed surface
Will be available in the following sizes: 4×5″, 5×7″, 8×10″, 11×14″, 16×20″
Custom sizes may be available: 4×10″, 7×17″, 8×20″, 12×20″, 14×17″, 20×24″ and some rolls of different sizes
Very dark red light is required due to high speed.
If you experienced bubbles between ribs and inner layer, that could be problem you apply too much glue on both side, I experienced that problem too, it ruins all works and time spent.
I tried to apply glue with edge of a plastic smear knife instead of brush, which results an even and wide spray area. I used it on both ribs and inner layer, put them aside for about 10 minutes, then apply both side contacted, with a dry towel I carefully rub in small circle on inner layer , to check if any bubble exists.
Then I apply all surface with iron in mild temperature, no hard pressure, for about two minutes.
The result is perfect!
and with part of other side revealed. Lower right corner shows the plastic smear knife.
Picking fabric as bellows building material is not an easy job, for what bellows needs is the fabric as thin as possible, but can block the light away.
Darkroom cloth is thin enough, but if you think it can totally keep light away, think it twice.
Maybe it can block normal strength of light beam, but under the strong sun light, you should be cautious. I had mentioned this in previous post of preparing bellows material.
And I also mentioned that material for bellows that camera manufacturing companies picked, are rarely found in the market for common people, I believe that they are custom made exclusively for cameras.
So not only we pick darkroom cloth as inner layer for they are easy to get, and we need to apply one or two layers of acrylic paint on it to enhance the light blocking.
But how do we know this do provide absolute light blocking function??
Well, let's find out.
Overlay darkroom cloth which has been sprayed with acrylic paint, and the leatherette you pick as outer layer on a flash light, flash face up.
Turn on the power, and trigger the flash in a dim lit room, inspect with naked eyes, if any light coming out of the surface of the leatherette, it means acrylic spray is not thick enough.
I received mail asking for the rib pairs, concerning if both ribs were cut the tip of corner, then there will be no hint when folding at the first time.
That is correct, I would say, it is not a problem to an experienced bellows builder, but for a green hand that could lead disaster at folding.
I would suggest keep one rib tip for each pair, so it would be easy to follow when folding.
In my example, shape A would be the sides for up and down side, and both inner layer and outer layer will leave seam at this shape, leaving tips at this side would be better.
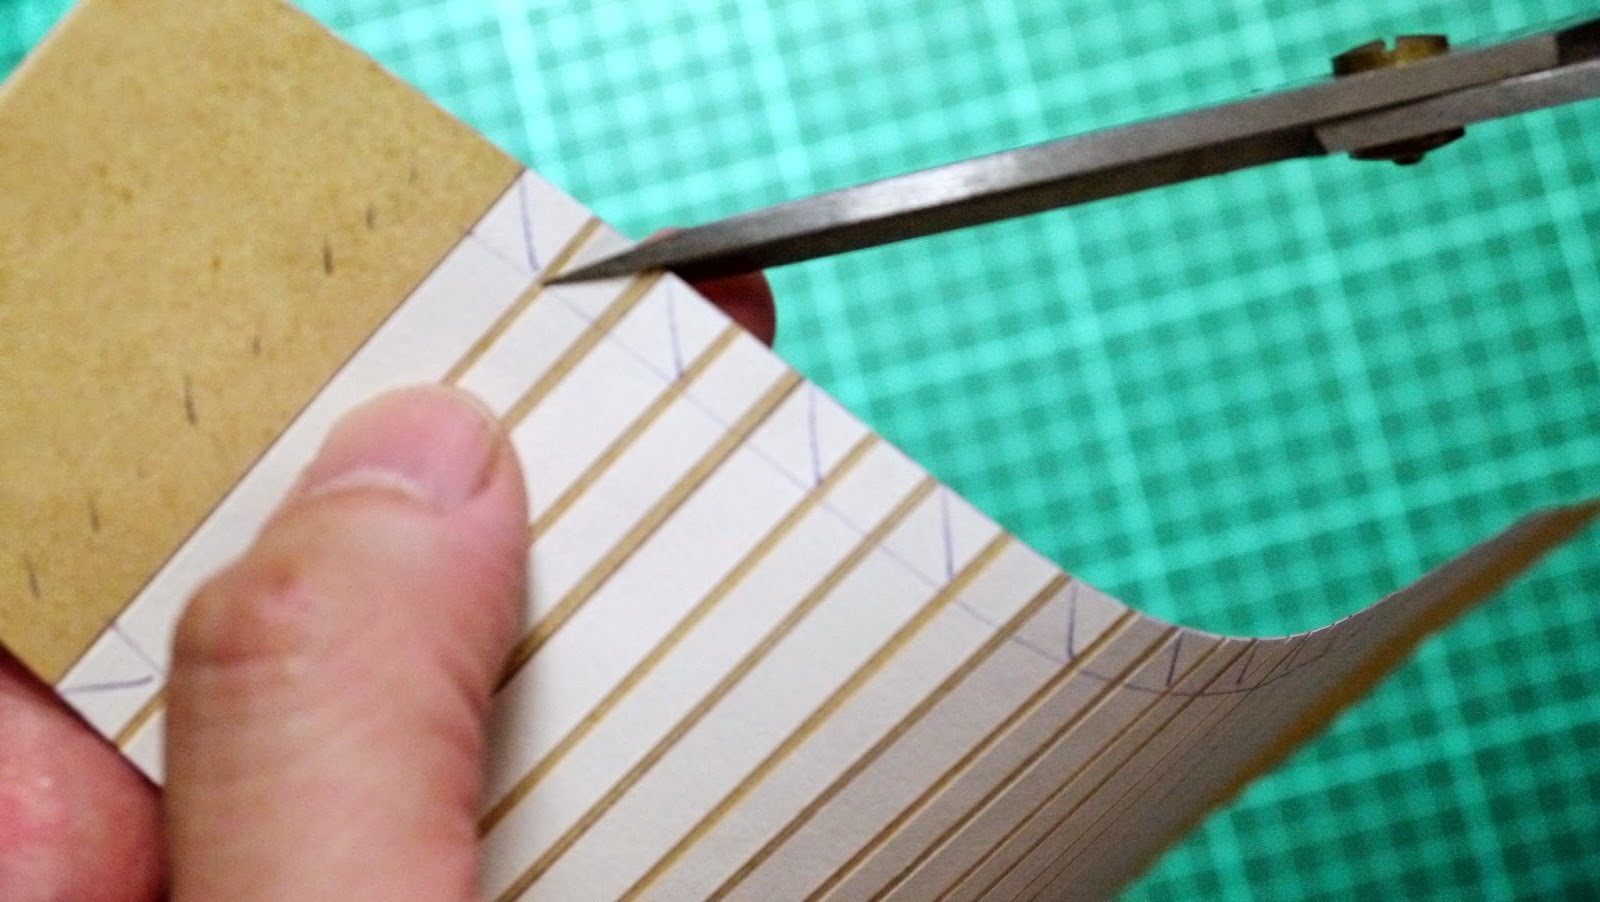
When preparing the rib pairs for shape A, follow the shape outline instead of inner line asPost 6Ainstructed, so we have space to trim the tips.
Best draw slant lines as trimming guide, every other rib has the same trimming angle, so if you did not mark them, it will be easily do it wrong.
As image shown, I mark every other rib, to remind myself when trimming.
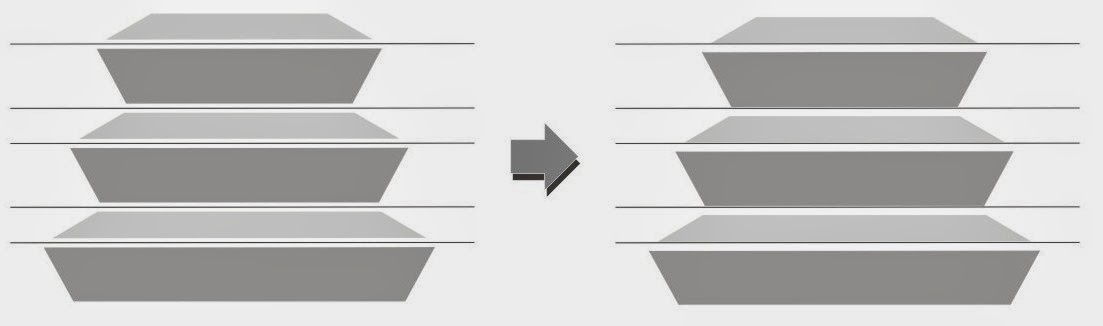
After trimming, let's layout all four side of rib pairs, you can see the difference now, comparing with the way previous mention in Post 6B.
This will help providing enough hints when folding bellows.
Finally, we come to the final step, fold all rib pairs into pleats, forming the bellows in shape.
Practically it starts from rear opening, but you can try starting from front opening, maybe you are good at it.
All started rib folds outward bound at rear opening, I had mentioned in Extend Study in Chapter 4, and template had been designed to achieve the purpose.
At the end where ribs of two sides meet is gap, which has no rib exists, you need to squeeze two ribs to form naturally a slant fold.
With some clothes pegs, hold just formed folds and gradually increasing folds to hold.
That's it, I think I had finished all the steps for building a bellows in easy way, no special tools need, no hard to find materials, and all you need is a little patience and some spare time.
I also mentioned that my bellows building procedure is different from this, for I made more than one bellows in one batch.
If you have no experience on bellows building, and are interested in building one, I hope this post help you out.
After applying outer layer onto rib pair cone with diluted decoupage gel, best we iron it to enhance the contact also to speed up the dry-up time.
1. We need a tool to help on ironing.
Water filter cartridge, I bought one in hardware store in less than US$1.00, very good use as inner support when ironing bellows. I borrowed handles and connectors coming from wasted mop to extend two cartridges if bellows is in long size.
Taking off bellows from template plastic cone is tricky, but quite easy, just roll down exceeding part of leatherette on rear opening, then you can easily slide off the bellows, watch the video shows.
Remember always having oven paper in between bellows and iron, to avoid any surface harm if iron temperature is set too high or scratching.
Inspecting the surface if any bubble inside the leatherette, press with iron and smooth gliding on top of it to get it out.
Most iron has temperature setting for different clothing, there should be one set for Nylon, you can start by this setting, to see if it
2. Put bellows aside overnight for thoroughly dry out.
With a pair of sharp scissors, trim both unwanted part of openings. First, trim off those extra part with only one layer of leatherette, there is a distinct border for reference.
Then the extra parts that exceed where rib pairs located. You can refer the rib pairs from outer layer surface, carefully trim off the exceeding part, leave both openings with edges of two sides higher than the other two sides, that is nature for we arranged shape A one rib lower thant shape B, remember that?
To skip the trouble finding different material for outer layer, you can pick darkroom cloth, same as for inner layer.
I used to pick Thai silk for outer layer for it is very thin and soft, but it will stretch or distort if you cover it with a little bit harder pull or press, that takes specially care and skills for applying it, so I will not recommend this to bellows building beginners.
(black and red in silk, orange in leatherette)
Another material you can pick is PU leatherette, it is common to see in everyday life, and easy to get some. But we need leatherette in rather thin thickness comparing with those for bag, sofa or car seats. You can find some leatherette in thickness about 0.2~0.4 mm for clothing in store, that will fit my need.
If your bellows size is larger than mine, then maybe thicker leatherette such as in 0.6~1.0 mm could be good option. But always pick the thinner one if you can.
And most important issue when you pick them, NO elastic feature for the fabric.
I won't bother to find genuine leather for outer layer, first, such thickness is very hard to find, you may find them in book covering material supply shop, and it is expensive, very expensive; and secondary, I don't like the idea using animal skin as covering.
7. Lay over the bellows layout template on leatherette, draw the outline at back side of leatherette. Be reminded the template is placed in wrong side, for we are drawing outline on inner side.
Place template at higher position to leave space beneath bottom line as image shows.
8. Now you can try to wrap the cone with leatherette, and move the leatherette up and down along the rib pair side line, find a perfect spot for the first rib, where the leatherette would completely cover the cone, and overlay a bit in the width of double sided tape.
You should align to the shape A rib which with no inner layer seam.
9. Applying gel both on leatherette and rib pairs cone, add a little bit of water into water based gel, to have a smooth spray and no so thick glue.
Be sure you pick the correct spot to begin applying leatherette on rib pair cone, locate the seam that inner layer made, then choose the opposite shape, watch the video implied.
In this step we should decide which side to place seam of inner layer as well as outer layer, so we can correctly leave overlaying part of cloth when sealing.
Bellows in this example is a taper one, which side close to the camera rail (rail bed) defines seam placement.
Image below shows my bellows when installed on camera, one narrow side close to the rail / camera bed. Image right side shows the section of bellows, outer layer should place seam at the bottom side, which is the narrow side (side A), so seam will not be viewed, and inner layer should place seam at the top side, diagonal to the outer seam.
Observing image above, extra overlay part of cloth should be left at wider side (side B).
1. There are 4 sides of rib pairs stripes, and 4 gaps where no rib exists in between, these gaps are the places rib pairs intersect with adjacent side rib pairs.
But what we have on layout template, there are 4 sides, with 5 gaps!
The left most gap in template is exactly the same one at the right most, they represent the gap that besides the seam. Extra one gap has to be cut off, but which one you should cut off?
Referring to the image above, the seam besides shape A should be cut off, and not only the gap besides shape B should be kept, it also should be extended some more part for OVERLAY area.
2. With 5 mm double sided tape, paste a long stripe of tape by the side B, noticed that tape is pasted outside of the gap area.
2. Trim off bellows layout from darkroom cloth, but leave space around the layout.
3. With a very sharp blade (best brand new utility knife tip), trim the edge of shape A, leave NO gap space, and the edge of shape B, by the side of double sided tape. A sharp blade can reduce the chance resulting fraying edge, and thanks to the nylon material as well acrylic paint, darkroom cloth tends to have very brisk edge. I would trim off a little bit of double sided tape, to keep the edge sharp.
4. Before overlaying the edge to seal the seam, we should know exactly how to align both side ribs. Ideally if ribs extends to the corner, they should form a zigzag line between both side ribs, which is easy to align. Our bellows has simplify the ribs, so you have to in vision an imaging rib, which extends its base to the other side, as orange dash line shows.
Always align the rib with the one that sits on the bottom line, I have told you reason why.
5. With a sheet of template plastic, roll it into a cone, fit its size exactly as bellows, now the bellows is in 3 dimension status, no need to build a bellows model for it as many instructions revealed. Actually, I found out that building a model for bellows tends to misguide builders, for they would set two gaps for each side and resulting a wrong size product.
You can trim template plastic sheet beforehand of forming the cone, use bellows layout as guide, expand the outline as big as sheet allows, this will help if you want this cone stand still on the desk.
4. Apply glue gel onto the rib pairs, you can apply all four shapes in a time, or one at a time.
I pick decoupage gel as bellows glue both for inner and outer layer, for they are water based, designed for fabric material, and they are easy to use, can be re-positioned without difficulty, and most importantly, it is water resistant and fabric still feel soft.
This is water base glue, so before it is totally dry out, it seems the stickiness is not so good at work, but don't worry about that, and we can get good use of this characteristic, adjust the position without any problem.
Align shape with bottom line, never forget this!!
5. Now kraft paper base of rib pairs has done their job, successfully carries rib pairs onto inner layer, they should be torn off.
Spray a mist of water on top of the kraft paper, let the paper soak water, this will reduce stickiness of repostional adhesive as well as decoupage glue gel, so it helps tearing off kraft paper, but be cautious of the ribs too.
After tearing off the paper, ribs are still wet, decoupage gel won't stick them tightly unless totally dry out, so we iron the ribs, to speed it out.
6. Take a piece of oven paper, which is waxy, preventing iron directly touch the nylon cloth, also ribs sticking onto iron.
Do not iron outside the oven paper, if iron touch the cloth directly, it may leave marks on it.
Notice that after ironing, ribs are firmly stick at inner layer, when I turn the layer to other side, ribs twitches with cloth, showing that dry out gel do the good job.
I pick darkroom cloth as inner layer for it is easy to find, almost every store sells cloth has it, and it is cheap, but most of all, it is very thin, made in nylon so it is very sturdy and it won't stretch, this is important when you pick fabric material for bellows.
There are darkroom cloths with both side in black or one side in sliver, I won't choose silver version unless I planned to cover the bellows in lighter color as outer layer, such as red or white.
But there is a minor problem for darkroom cloth as inner layer, for it should have a very dull matt surface, reducing any light reflection of diffraction happening on the light path from lens to negative inside the bellows, and I think that darkroom cloth made in ultra thin nylon thread with sort of silky surface would somewhat reflect a bit. Observing some vintage camera bellows, many of them are with cotton fabric as inner layer, which has dull dark grey as dye color, and I think they were made with a thin resin coating, to fill out all the meshes holes.
Although darkroom cloth are so called, but it is not 100 percent light proof, image below shows two pieces of darkroom cloth, left one has been sprayed with two layers of black acrylic paint,comparing with right one which in original condition.
Applying dull black acrylic paint can improve darkroom cloth in two considerations, make the surface much more dull matt, and to enhance the light blocking ability.
1. Squeeze some acrylic paint into a shallow dish, dilute with water in ratio about 3:1, with a wide flat brush brushes paint onto darkroom cloth surface, apply as little paint as possible each time, and make sure paint spray evenly, put it still for drying up, you can apply second layer of paint if feel necessary.
I applied one layer of acrylic paint to each side, to see which side gets the best dull surface, you can tell that one side is duller than the other.
After applying acrylic paint, cloth gets different touch, from nylon cloth into some kind of leather, and it surely improve the light blocking ability.
2. Inspect painted darkroom cloth, decide which side has duller mate surface, place duller side facing down. Lay the bellows layout template on top of the cloth, and trace the outline lines. With shape A and B template, draw top and bottom guide lines within each shape.
Now try place 4 rib pairs stripe shapes on it, remember always align with the bottom line.
And be reminded again each rib pairs strip shape has two more ribs beneath the bottom line, you should align third rib to the bottom line.
3. Fold each rib pair stripe shape between 2nd. and 3rd. rib at the bottom, forming a distinct folding line shows where the bottom line is when place the glued rib pairs. Or you can draw a line that place if you want it more clearer to see.
Rib stripes are ready for template layout, they will be placed onto kraft paper guide, for fixing them at the arranged place, a little bit of glue is needed. Repositionable adhesive makes you easily re-arrange stripe positions once you are not satisfy with them, so it makes job done perfectly without difficulty.
Spray a thin layer of repositionable adhesive onto the kraft paper guide, spray evenly, but as little as possible, we need it help fix the rib, but also to reposition when need. Put it still for about 5 minutes, then place the stripes according to the guide. Don't mix 7 mm stripes and 5 mm stripes and don't get them at the wrong position. I would paste 7 mm stripes first, then 5 mm stripes.
Ideally the gaps should be at the center of two stripes, but I found it hard to fulfill in such a limited space, so I would place stripes exactly by the guide lines, it is much easier to follow, and the result is the same.
Cut the shape with ribs
Ideally ribs should looks like what shows in the image below, each rib extends tips to the corner, they cover every corner, and help forming the folds.
As I mentioned before, I prefer complete ribs, with the help of CG software and plotting/cutting machine, it is not so hard to achieve, but if you plan to do that with bare hands, then I wish you best luck.
To simplify the building procedure, and to avoid stacking too many layers of ribs at corners, resulting unnecessary problem, many industrial produced bellows have simplify ribs like what shows at image below.
What our ribs will be cut into the shape similar to this.
1. Notice that ribs will not reach to the end of shape, so we need to mark the borders for these ribs. With zigzag ruler align by slant side of shapes, add two border lines on both shape A and B. These two inner lines in the shape are the borders for ribs.
2. Please be reminded again that the shape A/ B template are made with extended rib pairs, thatis, what we really need for bellows is in the area within top and bottom lines, extended areas were left for gluing front /rear opening frame only. The bottom line is the most important reference, for its length was defined by frame width or length, we must keep them precisely as desired, making sure that rear frame will fit into the bellows when gluing. Do observe closely, you can find out that the rib shape on top of the bottom line, is the 5 mm stripe, the narrower one. As image shows, the yellows stripes. And the rip shape just under the top line, is the 7 mm stripe, the wider one, as pink stripes show.
Now keep this in mind, place shape A template on top of the rib stripes, align the bottom line with the 5 mm stripes (yellow stripes in the image below), leave about 2 stripes underneath bottom line, as extend rib pairs. Since we have more stripes pasted as we need, so maybe some stripes will be left unused, that’s fine, they are supposed to be. Double check that the stripe beneath the top line is 7 mm stripe (pink stripe in the image below), and leave two extend stripes for frame gluing. What we cutting off is as grey area shown in the image below.
Rotate the stripes 180 degree, and get another rib pair stripes. Now 2 shape A rib pair stripes are done!
3. Do as step 2 instructs, make 2 shape B rib pair stripes.
Now four sides of rib pairs are all ready, next step is to paste them onto inner layer.
Be aware these four rib pair stripes are pasted on kraft paper with repositional adhesive, just temporarily keep them in the place, so handle them in gentle manner.