Tuesday, August 4, 2015

GALAXY HYPER SPEED Direct Positive Photo Paper

Looks what we have here?

From now on, you can shoot with 8x10 or larger camera but no enlarger needed.


  • RC-based (resin-coated) positive reversal photographic paper containing the largest amount of silver in the industry that allows to create distinctive half-tones and rich dark tones.
  • Very high ISO-speed which corresponds to about 120 film ISO. High speed enables shorter exposures — no more long sitting in front of the camera!
  • No need for a negative, you can shoot directly on the paper.  Adjusted reversal process. User-friendly.  
  • Fixed grade: contrast.  
  • Glossy embossed surface  
  • Will be available in the following sizes: 4×5″, 5×7″, 8×10″, 11×14″, 16×20″ 
  • Custom sizes may be available: 4×10″, 7×17″, 8×20″, 12×20″, 14×17″, 20×24″  and some rolls of different sizes
  • Very dark red light is required due to high speed.

Monday, June 22, 2015

Answering the question: Air Bubbles on surface

If you experienced bubbles between ribs and inner layer, that could be problem you apply too much glue on both side, I experienced that problem too, it ruins all works and time spent.


Follow the instruction in this link

and you should get a perfect glue without bubbles

I tried to apply glue with edge of a plastic smear knife instead of brush, which results an even and wide spray area. I used it on both ribs and inner layer, put them aside for about 10 minutes, then apply both side contacted, with a dry towel I carefully rub in small circle on inner layer , to check if any bubble exists.

Then I apply all surface with iron in mild temperature, no hard pressure, for about two minutes.

The result is perfect!


and with part of other side revealed. Lower right corner shows the plastic smear knife.


Friday, May 15, 2015

Answering the question: bellows cloth blocking light or not?

Picking fabric as bellows building material is not an easy job, for what bellows needs is the fabric as thin as possible, but can block the light away.

Darkroom cloth is thin enough, but if you think it can totally keep light away, think it twice.

Maybe it can block normal strength of light beam, but under the strong sun light, you should be cautious. I had mentioned this in previous post of preparing bellows material.

And I also mentioned that material for bellows that camera manufacturing companies picked, are rarely found in the market for common people, I believe that they are custom made exclusively for cameras.

So not only we pick darkroom cloth as inner layer for they are easy to get, and we need to apply one or two layers of acrylic paint on it to enhance the light blocking.

But how do we know this do provide absolute light blocking function??

Well, let's find out.

Overlay darkroom cloth which has been sprayed with acrylic paint, and the leatherette you pick as outer layer on a flash light, flash face up.


Turn on the power, and trigger the flash in a dim lit room, inspect with naked eyes, if any light coming out of the surface of the leatherette, it means acrylic spray is not thick enough.


Thursday, May 14, 2015

Last 6 adapters for SL66 camera left

Maybe I am the only one in the world who sells this adapter, but soon you have to find them on ebay I think.
http://salihonbashome.blogspot.tw/p/something-for-sale.html 

Thursday, May 7, 2015

Answering the question

I received mail asking for the rib pairs, concerning if both ribs were cut the tip of corner, then there will be no hint when folding at the first time.

That is correct, I would say, it is not a problem to an experienced bellows builder, but for a green hand that could lead disaster at folding.

I would suggest keep one rib tip for each pair, so it would be easy to follow when folding.

In my example, shape A would be the sides for up and down side, and both inner layer and outer layer will leave seam at this shape, leaving tips at this side would be better.

When preparing the rib pairs for shape A, follow the shape outline instead of inner line as Post 6A instructed, so we have space to trim the tips.

Best draw slant lines as trimming guide, every other rib has the same trimming angle, so if you did not mark them, it will be easily do it wrong.  

As image shown, I mark every other rib, to remind myself when trimming.


After trimming, let's layout all four side of rib pairs, you can see the difference now, comparing with the way previous mention in Post 6B.

This will help providing enough hints when folding bellows.


Tuesday, April 28, 2015

9. Fold bellows in shape

Finally, we come to the final step, fold all rib pairs into pleats, forming the bellows in shape.

Practically it starts from rear opening, but you can try starting from front opening, maybe you are good at it.

All started rib folds outward bound at rear opening, I had mentioned in Extend Study in Chapter 4, and template had been designed to achieve the purpose.


At the end where ribs of two sides meet is gap, which has no rib exists, you need to squeeze two ribs to form naturally a slant fold.

With some clothes pegs, hold just formed folds and gradually increasing folds to hold.


That's it, I think I had finished all the steps for building a bellows in easy way, no special tools need, no hard to find materials, and all you need is a little patience and some spare time.

I also mentioned that my bellows building procedure is different from this, for I made more than one bellows in one batch.

If you have no experience on bellows building, and are interested in building one, I hope this post help you out.

Thanks for reading.

Daniel

8. Iron and Trim Bellows

After applying outer layer onto rib pair cone with diluted decoupage gel, best we iron it to enhance the contact also to speed up the dry-up time.

1. We need a tool to help on ironing.

Water filter cartridge, I bought one in hardware store in less than US$1.00, very good use as inner support when ironing bellows. I borrowed handles and connectors coming from wasted mop to extend two cartridges if bellows is in long size. 


Taking off bellows from template plastic cone is tricky, but quite easy, just roll down exceeding part of leatherette on rear opening, then you can easily slide off the bellows, watch the video shows.

Remember always having oven paper in between bellows and iron, to avoid any surface harm if iron temperature is set too high or scratching.

Inspecting the surface if any bubble inside the leatherette, press with iron and smooth gliding on top of it to get it out.

Most iron has temperature setting for different clothing, there should be one set for Nylon, you can start by this setting, to see if it 


2. Put bellows aside overnight for thoroughly dry out. 
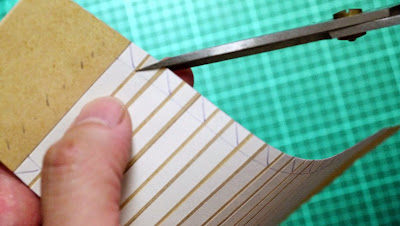
With a pair of sharp scissors, trim both unwanted part of openings. First, trim off those extra part with only one layer of leatherette, there is a distinct border for reference.


Then the extra parts that exceed where rib pairs located. You can refer the rib pairs from outer layer surface, carefully trim off the exceeding part, leave both openings with edges of two sides higher than the other two sides, that is nature for we arranged shape A one rib lower thant shape B, remember that?