You can't rush US!
Sunday, October 23, 2011


Wednesday, October 19, 2011
Modified sheet film washer
I modified a Kostiner roll film washer for both sheet/ roll film, it was ten years ago.
Kostiner film washer is a tube style in round shape, for it is designed for 135/ 120 roll film, sink developed film rolls into tube, let running water flow from bottom and overflow on top, with bubble generated with water, to clean films.
Round shape tube makes sheet film hard to use, and I managed to modify it into sheet/roll film washer.
1. Cut out the tube, leave square shape washer base, and re-glue the tube into a square shape.


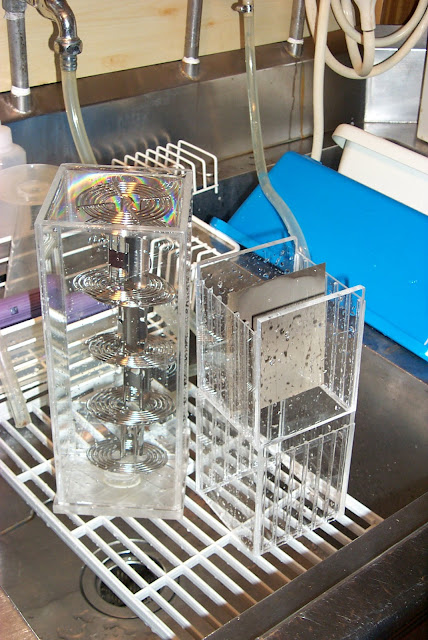


Kostiner film washer is a tube style in round shape, for it is designed for 135/ 120 roll film, sink developed film rolls into tube, let running water flow from bottom and overflow on top, with bubble generated with water, to clean films.
Round shape tube makes sheet film hard to use, and I managed to modify it into sheet/roll film washer.
1. Cut out the tube, leave square shape washer base, and re-glue the tube into a square shape.
2. Build sheet film hanger box, each box can hold 6 sheet films, 2 boxes make 12 sheet films washed at the same time.


3. Test, found out that film hanger needs to keep films in position to prevent running water brings films away. Washer holds four 120 format film rolls at same time.

4. For even better foolproof when inserting film into ditches, make separation of each film with arcylic tubes, effects are great!
5. Finally, build some small boxes to hold one hanger only, so I can use them as film fixer container or for water stain remover. I use BTZS tubes to develop films, and with this box, 500 c.c. of fixer can easily do their job, and this way I don't have to worry scratches generated during fixing step.
 |
Sunday, October 2, 2011
Byron workshop, half DIY your own camera!
Time's up, thanks for the mails who are interested in the course. To those who receive confirmed mail for workshop, please send US$900 to my Paypal account sali.honba@msa.hinet.net, and prepare your camera + lenses, we should start at the end of this month.
Daniel
Tim wrote to me and he makes the point, that I set the deadline of application at 10/16, how come I reject others before the date?
So I will leave 2 more participants available for who send mails to me before 10/16, candidates will be considered after the date arrived, so no hurry, take your time, just send your mail before 10/16.
thank you very much.
6 participants, hope I can handle that well.....
***
Amazingly, 6 appliers for workshop already, so please do not send your mail to me now, workshop takes four participants only. thank you very much. Daniel
***
I've been thinking about this recently, since one of my craftsman got stroke months ago, I can't stop wondering, what if I GOT stroke, will my unique Polaroid 4x5 conversion discontinued?
Pass my thought to friends, and thinking of letting more people could own Byron camera, I would held an experimental workshop, to help participant build one.
But the procedure could be very difficult if all by instructions only, there are some steps which needs special tooling, and some steps need CNC lathe machine, not everyone could find a helping hand around.
So I will ask participants follow my instruction, in some steps, to send their parts to me, I will help them to finish those steps, and then let them go on to next step.
I envision there will be about two steps for sending back parts, by sending back their parts, I will enclose all the parts needed for building Byron, including those tailored parts that I designed, exclusive for Byron.
The most complicated parts now I think most people will encounter, will be at the step building bellows, not yet decide whether I will make one for each other, or let them try, so there will be sort of experiments in it, participant not only need to be skillful on DIY, prepare all kinds of hand tools, and need a lot of patience, willing to help me to perfect the instruction, so there will be one complete instruction left when the camera is build, workshop at the end.
Workshop will take about 3 months for the course. It should start at the end of this month. Instruction will be released one by one, as a step for every two weeks,
Cost will be US$900, including all parts and two shipping postage during the course, but I am asking if anyone is interested in this way of DIY, let me know, mail me, all I need is about 4 participants, besides hand tools, you have to prepare your own Polaroid 110B plus lenses you choose, (or 110A + 900) and the conversion type (limited in Type A or B), drop me a mail, we could communicate privately.
If you are interested in this way, please let me know before 10/16. You are not really in the workshop by sending mail, just let me know if there are people who are interested.
thank you very much.
Daniel
salihonba@gmail.com
ps. DIY instructions will not be published in public, only participants are allowed to login and read it.
You can choose one Prime lens for matching cam curve, that is, your range-coupled lens. I will grind the cam curve for you, but I need you send the lens to me. other lenses you choose for Byron will be un-coupled range finding.
Daniel
Tim wrote to me and he makes the point, that I set the deadline of application at 10/16, how come I reject others before the date?
So I will leave 2 more participants available for who send mails to me before 10/16, candidates will be considered after the date arrived, so no hurry, take your time, just send your mail before 10/16.
thank you very much.
6 participants, hope I can handle that well.....
***
Amazingly, 6 appliers for workshop already, so please do not send your mail to me now, workshop takes four participants only. thank you very much. Daniel
***
I've been thinking about this recently, since one of my craftsman got stroke months ago, I can't stop wondering, what if I GOT stroke, will my unique Polaroid 4x5 conversion discontinued?
Pass my thought to friends, and thinking of letting more people could own Byron camera, I would held an experimental workshop, to help participant build one.
But the procedure could be very difficult if all by instructions only, there are some steps which needs special tooling, and some steps need CNC lathe machine, not everyone could find a helping hand around.
So I will ask participants follow my instruction, in some steps, to send their parts to me, I will help them to finish those steps, and then let them go on to next step.
I envision there will be about two steps for sending back parts, by sending back their parts, I will enclose all the parts needed for building Byron, including those tailored parts that I designed, exclusive for Byron.
The most complicated parts now I think most people will encounter, will be at the step building bellows, not yet decide whether I will make one for each other, or let them try, so there will be sort of experiments in it, participant not only need to be skillful on DIY, prepare all kinds of hand tools, and need a lot of patience, willing to help me to perfect the instruction, so there will be one complete instruction left when the camera is build, workshop at the end.
Workshop will take about 3 months for the course. It should start at the end of this month. Instruction will be released one by one, as a step for every two weeks,
Cost will be US$900, including all parts and two shipping postage during the course, but I am asking if anyone is interested in this way of DIY, let me know, mail me, all I need is about 4 participants, besides hand tools, you have to prepare your own Polaroid 110B plus lenses you choose, (or 110A + 900) and the conversion type (limited in Type A or B), drop me a mail, we could communicate privately.
If you are interested in this way, please let me know before 10/16. You are not really in the workshop by sending mail, just let me know if there are people who are interested.
thank you very much.
Daniel
salihonba@gmail.com
ps. DIY instructions will not be published in public, only participants are allowed to login and read it.
You can choose one Prime lens for matching cam curve, that is, your range-coupled lens. I will grind the cam curve for you, but I need you send the lens to me. other lenses you choose for Byron will be un-coupled range finding.
Thursday, September 29, 2011
Best dress for Byron camera
Bob made wonderful type 55 instant film, named New55, and he made some gorgeous test shots.
http://black-gallery.blogspot.com/
http://black-gallery.blogspot.com/
Saturday, September 24, 2011
Three types of Byron conversion
Byron has been developed for about 6 years, during the period, concluding clients' feedback and some more request, the conversion service now had been categorized into three types, according to client's lens selected.
Lenses' focal range are limited in 75~150mm, any lens with focal length lesser or greater are not feasible for Byron. 75mm lens is the widest lens Byron can bear, and even in this lens, there is some 4~5mm on side will be blocked by rail, please read the related post. But the situation has been improved, I managed to move the lens a bit higher, to bypass the barrier, so 75mm lens is the set.
Type A, Byron as snap shooter
Snap shoots on streets with a 4x5 format rangefolder is what the original idea when I developed Byron system, and the purpose needs a camera with speed on operation and as lightweight as possible.
Lens board for type A is in circular shape, about 60mm in diameter, when lens board threaded with #0 shutter, it is so tiny that you bare notice there exist a board with the lens, it takes no space, has advantages when traveling light, and stored in bag, that is important for street snaps.


Lenses selected based on the criteria mentioned above, we need lens could be stayed in camera when folded, so it could be ready to shoot whenever fold out, so lens should be tiny, shutter limited in #0 or even smaller, and the rear element should be no bigger than 44.8mm in diameter.

What the lenses I recommend for this type of conversion are:
Schneider Angulon 6.8/90mm
*Schneider Symmar-S 5.6/100mm
Carl Zeiss Tessar 4.5/105mm
Carl Zeiss Tessar 4.5/120mm
Rodenstock Ysarex 4.7/127mm (original lens on 110B camera)
*Fujinon W 5.6/135mm
**Rodenstock Geronar 6.3/150mm (or Caltar II-E 6.3/150mm)
They are all small enough to stay in camera when fold, and the image coverage is just enough for 4x5 format.

(*Lens must be taken off before camera folded.)
(**In type A conversion, 150mm lenses are limited in Geronar or Caltar II-E only, for they have shorter flange to focal image distance, which just great for type A conversion, other 150mm lenses such as Apo-Symmar 5.6/150, Apo-Ronar 9/150mm or Nikkor/Fuji lenses, their flange-focal image distance just exceed rail end, so they all fall into type B conversion, which has different front standard, can solve the longer f-f distance problem.)
Type B, Byron for those big rear lenses
Many modern design and better optical performance lenses have big front or rear elements, or with bigger aperture, bigger shutter.
Clients want to use them, and don't really care of the carrying issue or lens exchanging on field problem, they own these lenses already, and hope to migrant them onto Byron.

In this type, a new front standard and lens board system were developed to fulfill the purpose, any lens in #0 or #1 shutter is acceptable, and if the rear element is within 60mm in diameter, the lens could be mounted directly, no need to screw off the rear first. Due to the size, lens must be taken off before camera is folded.


What the lenses most situation I encounter, and they are able to be mounted directly without problems,
Rodenstock Grandagon-n 4.5/75mm (rear dia. 59.8mm)
Sinaron W 4.5/75mm (rear dia. 59.8mm)
Schneider Super Angulon 8/90mm (rear dia. 56.8mm)
Schneider symmar 5.6/100mm
Carl Zeiss Planar 2.8/100mm (in #1 shutter)
Schneider Angulon 6.8/120mm (in #1 shutter)
Schneider Xenotar 3.5/135mm (in #1 shutter, rear dia. 47.7mm)
Voigtlander Apo-Lanthar 4.5/150mm (in #1 shutter)
Voigtlander Heliar 4.5/150mm (in #1 shutter)
Schneider Apo Symmar 5.6/150mm
Rodenstock Apo Ronar 9/150mm
Nikkor/ Fuji 150mm lens
Type X, only for Xenotar 2.8/150mm
This is a big, heavy lens that many photographers want to use it on portrait for its bokeh, for this special lens, I have developed a variety from type B, exclusive for this lens.

Xenotar 2.8/150mm lens must be mounted on a #2 shutter, I know it is hard to find for such a shutter, but Byron just can not take normal #3 shutter anymore, too big in size.
The rear element is 62.85mm in diameter, Xenotar must first screw off the rear element, mount onto the standard, then screw back the rear.
Not only front standard needs to be enforced, rail and many other parts need to be re-adjust to allocate this big boy, the cam curve needs greater precision for its super shallow DOF too.
Oh, recently I saw other conversion service on ebay, also for Xenotar 2.8/150, although I did not see any image about the converted camera for Xenotar 2.8/150 yet, but the service charge do really THUNDERSTRUCK me a bit!
Lenses' focal range are limited in 75~150mm, any lens with focal length lesser or greater are not feasible for Byron. 75mm lens is the widest lens Byron can bear, and even in this lens, there is some 4~5mm on side will be blocked by rail, please read the related post. But the situation has been improved, I managed to move the lens a bit higher, to bypass the barrier, so 75mm lens is the set.
Type A, Byron as snap shooter
Snap shoots on streets with a 4x5 format rangefolder is what the original idea when I developed Byron system, and the purpose needs a camera with speed on operation and as lightweight as possible.
Lens board for type A is in circular shape, about 60mm in diameter, when lens board threaded with #0 shutter, it is so tiny that you bare notice there exist a board with the lens, it takes no space, has advantages when traveling light, and stored in bag, that is important for street snaps.
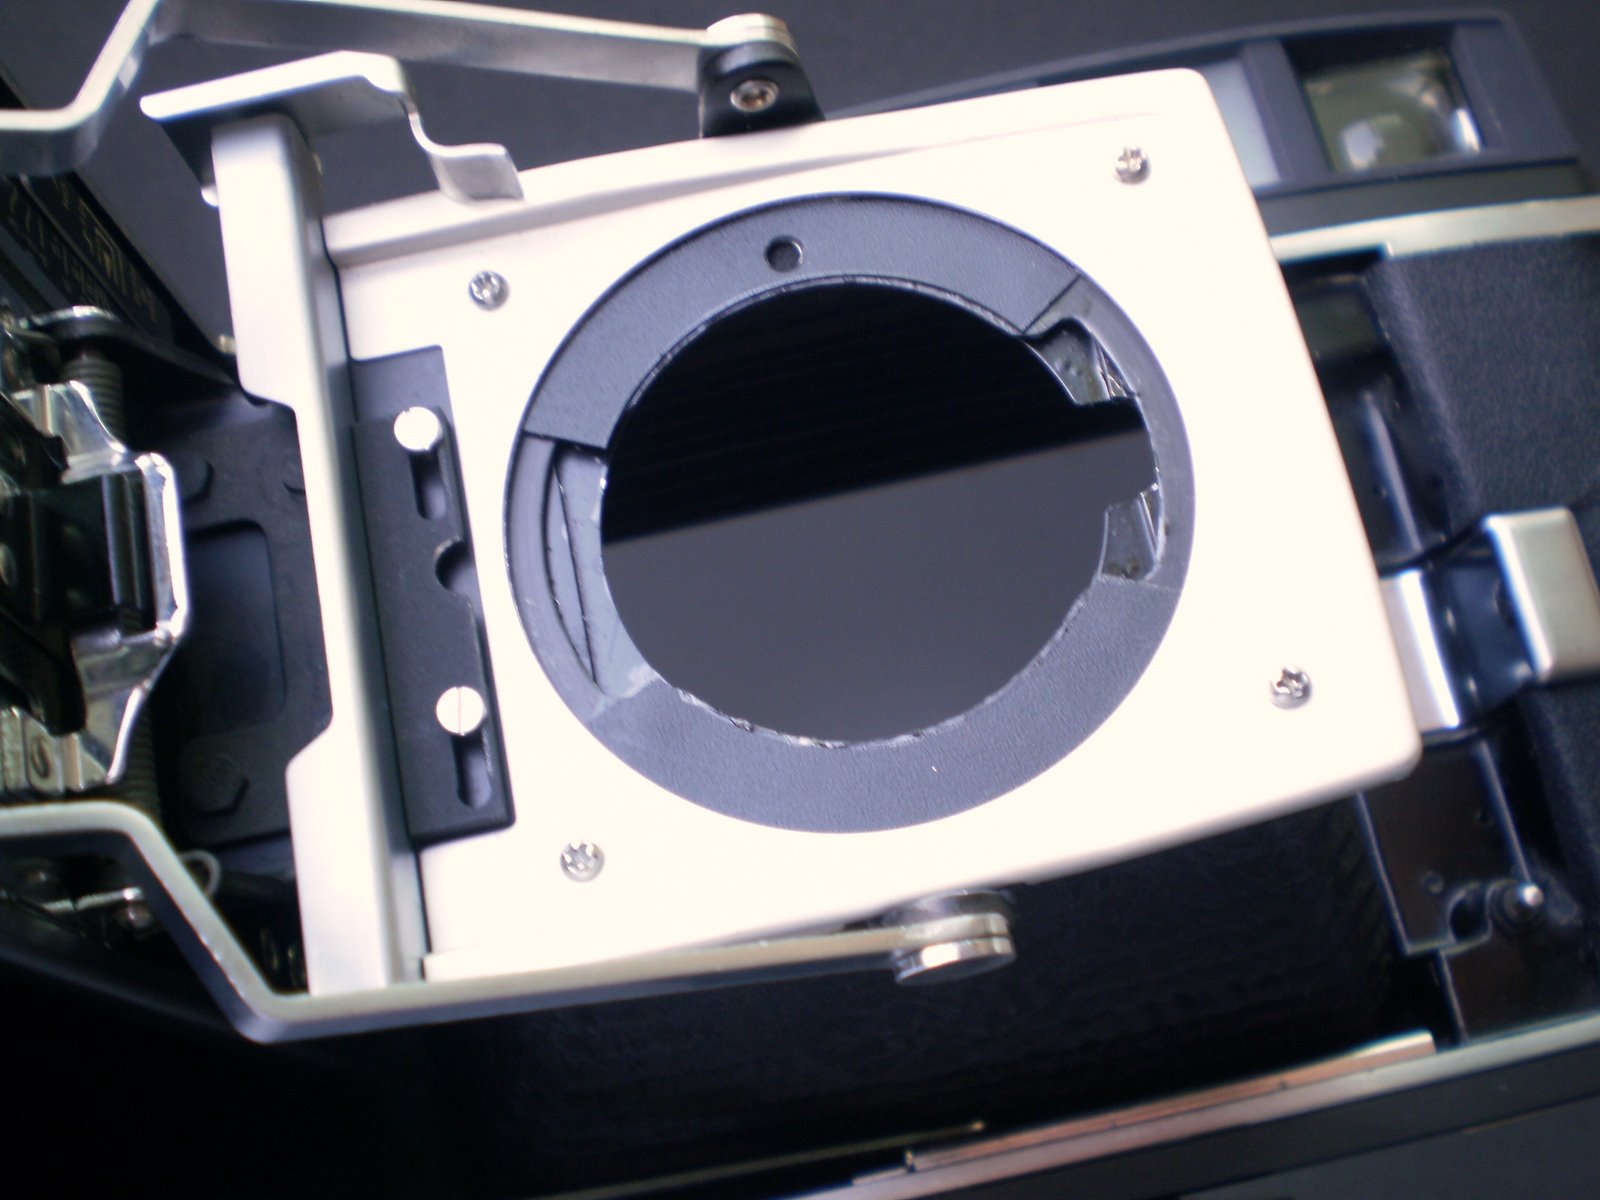

Lenses selected based on the criteria mentioned above, we need lens could be stayed in camera when folded, so it could be ready to shoot whenever fold out, so lens should be tiny, shutter limited in #0 or even smaller, and the rear element should be no bigger than 44.8mm in diameter.

What the lenses I recommend for this type of conversion are:
Schneider Angulon 6.8/90mm
*Schneider Symmar-S 5.6/100mm
Carl Zeiss Tessar 4.5/105mm
Carl Zeiss Tessar 4.5/120mm
Rodenstock Ysarex 4.7/127mm (original lens on 110B camera)
*Fujinon W 5.6/135mm
**Rodenstock Geronar 6.3/150mm (or Caltar II-E 6.3/150mm)
They are all small enough to stay in camera when fold, and the image coverage is just enough for 4x5 format.

(*Lens must be taken off before camera folded.)
(**In type A conversion, 150mm lenses are limited in Geronar or Caltar II-E only, for they have shorter flange to focal image distance, which just great for type A conversion, other 150mm lenses such as Apo-Symmar 5.6/150, Apo-Ronar 9/150mm or Nikkor/Fuji lenses, their flange-focal image distance just exceed rail end, so they all fall into type B conversion, which has different front standard, can solve the longer f-f distance problem.)
Type B, Byron for those big rear lenses
Many modern design and better optical performance lenses have big front or rear elements, or with bigger aperture, bigger shutter.
Clients want to use them, and don't really care of the carrying issue or lens exchanging on field problem, they own these lenses already, and hope to migrant them onto Byron.

In this type, a new front standard and lens board system were developed to fulfill the purpose, any lens in #0 or #1 shutter is acceptable, and if the rear element is within 60mm in diameter, the lens could be mounted directly, no need to screw off the rear first. Due to the size, lens must be taken off before camera is folded.


What the lenses most situation I encounter, and they are able to be mounted directly without problems,
Rodenstock Grandagon-n 4.5/75mm (rear dia. 59.8mm)
Sinaron W 4.5/75mm (rear dia. 59.8mm)
Schneider Super Angulon 8/90mm (rear dia. 56.8mm)
Schneider symmar 5.6/100mm
Carl Zeiss Planar 2.8/100mm (in #1 shutter)
Schneider Angulon 6.8/120mm (in #1 shutter)
Schneider Xenotar 3.5/135mm (in #1 shutter, rear dia. 47.7mm)
Voigtlander Apo-Lanthar 4.5/150mm (in #1 shutter)
Voigtlander Heliar 4.5/150mm (in #1 shutter)
Schneider Apo Symmar 5.6/150mm
Rodenstock Apo Ronar 9/150mm
Nikkor/ Fuji 150mm lens
Type X, only for Xenotar 2.8/150mm
This is a big, heavy lens that many photographers want to use it on portrait for its bokeh, for this special lens, I have developed a variety from type B, exclusive for this lens.

Xenotar 2.8/150mm lens must be mounted on a #2 shutter, I know it is hard to find for such a shutter, but Byron just can not take normal #3 shutter anymore, too big in size.
The rear element is 62.85mm in diameter, Xenotar must first screw off the rear element, mount onto the standard, then screw back the rear.
Not only front standard needs to be enforced, rail and many other parts need to be re-adjust to allocate this big boy, the cam curve needs greater precision for its super shallow DOF too.
Oh, recently I saw other conversion service on ebay, also for Xenotar 2.8/150, although I did not see any image about the converted camera for Xenotar 2.8/150 yet, but the service charge do really THUNDERSTRUCK me a bit!
Wednesday, September 14, 2011
Xenotar 135/3.5 on SL66
I dug my dehumidifier yesterday for my spared #2 shutter, and I found one long forgot Xenotar 135/3.5 sat there stared at me, I bought it last years, and then quickly shift my interest into big brother 150/2.8, this one left in the box till now.
It came as a barrel lens, with iris only, but I managed to fit it with a proper #1 shutter, and so there it can be mounted on Byron, or on my SL66.

This lens did not need extension tube, you can see bellows extends just about 1.5inch and you got infinity already, if you extend bellows to the end, focus can be as near as 1.5 feet.

Next time I will try to mount this beauty onto Byron, 135mm is quite wide for 4x5 snaps.
It came as a barrel lens, with iris only, but I managed to fit it with a proper #1 shutter, and so there it can be mounted on Byron, or on my SL66.

This lens did not need extension tube, you can see bellows extends just about 1.5inch and you got infinity already, if you extend bellows to the end, focus can be as near as 1.5 feet.

Next time I will try to mount this beauty onto Byron, 135mm is quite wide for 4x5 snaps.
Tuesday, September 13, 2011
How to read Kindle in bed with one hand
I love to read, especially while laying in bed, I can read all day in winter days, just head and hand outside of the blanket.
But with e-book like Kindle, it is nearly impossible to hold the device one hand only, it forces you to hold the device with two hands, or you will drop the book, or your hand feel awkward sour.
I searched the web, to see other people how they solve the problem, there are so many ppl love to read on bed, they must have good ideas to make the reading comfortable and cozy, but I hardly found one satisfy my need.
So I thought of many ways to "stick" Kindle in my palm, rubber band, silicon ring with wire, glove that with many small suckers...... and then this one is the most easy and comfort one.
All you need is a kitchen cleaning sponge, with a big silicon sucker in middle, to hold the sponge on wall tile. The cost is about US$1.5 here in Taiwan. we need the sucker only, let sponge stay in kitchen.


But with e-book like Kindle, it is nearly impossible to hold the device one hand only, it forces you to hold the device with two hands, or you will drop the book, or your hand feel awkward sour.
I searched the web, to see other people how they solve the problem, there are so many ppl love to read on bed, they must have good ideas to make the reading comfortable and cozy, but I hardly found one satisfy my need.
So I thought of many ways to "stick" Kindle in my palm, rubber band, silicon ring with wire, glove that with many small suckers...... and then this one is the most easy and comfort one.
All you need is a kitchen cleaning sponge, with a big silicon sucker in middle, to hold the sponge on wall tile. The cost is about US$1.5 here in Taiwan. we need the sucker only, let sponge stay in kitchen.


Make it suck at the back of the device, there you go, you can place it anywhere on the back, sometimes I read when at breakfast, I place the sucker at the middle top of the back, thus make it a good reading angle when placed on the table.
For improving the strength of sucker to hold, I use a piece of cutting sheet on back, make the sucker to hold the device, unless you pull it really hard, the sucker won't let go, no risk falling the device.


When laying in bed, I place it at lower corner, to fit my hand, so I can hold my Kindle one hand, and my thumb could help press the page down button.


Subscribe to:
Posts (Atom)