Showing posts with label Linhof bellows. Show all posts

Monday, July 23, 2012

Bellows building, one of a kind

My way of bellows building began about 15 years ago, at that time I needed a new bellows to replace my old Linhof Technika IV, and by trying errors, I gradually learned the knowledge of bellows building.
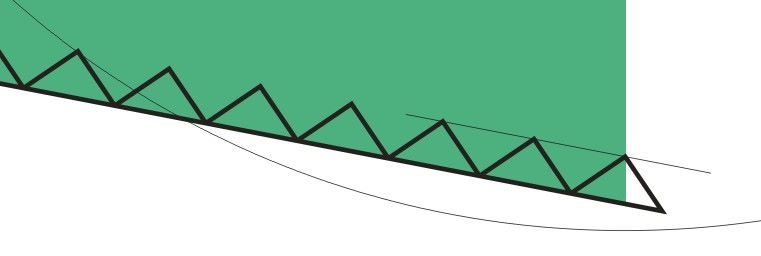
By inspecting tearing down old bellows, I found out that ribs between inner and outer layers, are not fully cover the whole area inside, always one pair sides of the ribs have the point ends, and the other pair of sides shaped in trapezoid, and thus rows of triangle areas are actually two layers formed, what if outer or inner layer cracked? didn't 3 layers of structure make better protection? I wondered why, shouldn't these ribs cover completely for the best light proof?
Seeking for the answer, I searched many resources of bellows building, including one tiny article bought from Xbay as below (I regret to pay for it!)
In page 4 of it (total 11pages) did show the ribs are made in two shapes, one set in tip points, and the other set is not, but it did not tell you why. And by building bellows for more than 10 years, I can insure you, this article did little help.
Instructed by this article, bellows building needs an exact 3D dimension form, so all 3 layers- inner/ ribs/outer layer build around the form, but when paste the ribs, there are problems when meet the corner, so the compromise happens, two sides of ribs keep the shapes needed, that is, tip corners, but other two sides had to be cut into trapezoid, what a pity!
And the article did not reveal the fact that, for fitting these compromise, 3D dimension form actually can not be made in EXACT dimension of bellows! 

I kept search for answers for years, and I do find it! It is a compromise of mass production and the least feasibility. What a joke!
Google the web, there are people hand build their bellows, and generously reveal their way of bellows building, but many of them followed the mass production way, although they are made in hand.

So I built my way of bellows building, NO compromise.
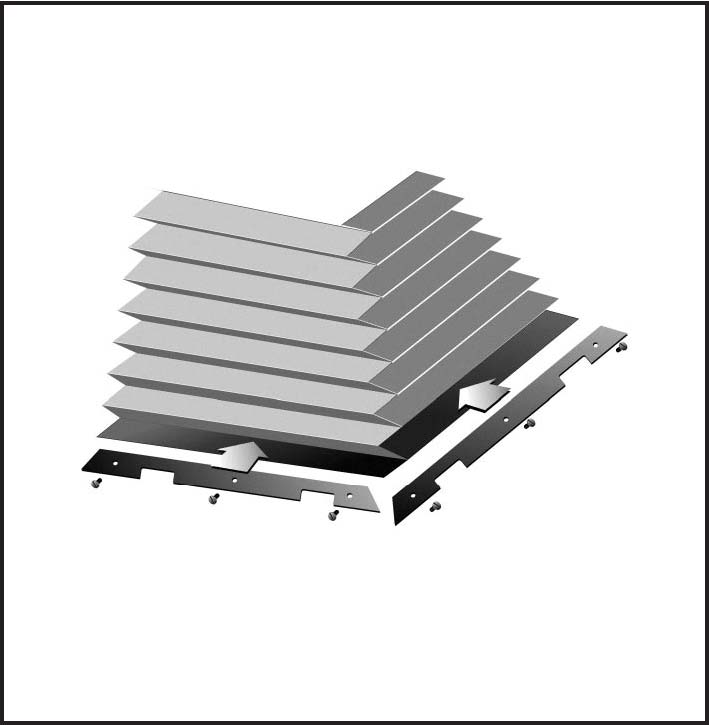
These bellows are for the most recent batch conversion, you can see there are ribs fully cover the bellows, no triangle areas, and this is one of a kind, dared I say, now in the world.

Tuesday, April 6, 2010

Some useful information for camera DIY

DIY Custom Camera Bellows Kit
This is cool!
Though not my way of bellows making, but it is good for starter.

Camera Bellows Outer Cover Fabric
It is too thick to me, but should be very good material for size larger than 4x5.....
(11/04 add) there is going to provide a much thinner material, when Sorin solved the lightproof problem and cost problem. In my opinion, as long as you let buyers aware that 3 layers of bellows construction is 100% lightproof is enough, no need for additional treatments, that will increase thickness.

Fine Grain DIY Ground Glass Kit
and this one shows you how to grind your own ground glass, amazing!

Friday, June 26, 2009

Is it the bellows you want?

Now we are at the key point of bellows making.

You have draw the frame, according the dimension you need, and hopefully make a bellows exactly fit your camera.

But I tell you, you are not.

Your bellows will be too small for your frame, front and back.

Let me show you why.

It is 120mm we need for back opening, if you remember. And that was not defined by first rib, the first rib will be folded in and glued to the second rib, so it is the second rib really counts.

The real dimension I show you in the picture tells you, your bellows is too small, only 117.6mm on this side, not 120mm. That yellow rib, will be folded in and glued with the second one.

From Drop Box


Other instruction will suggest to make some bellows in paper, measure the sizes of opening, then modify, and make another one paper model, measure, modify again...... till you satisfied.

Well, I like to make things correct in one shot.

Draw line on the tip of triangles, extend it out of the shape, then move the triangles align the line, till first tip reaches the edge of the shape.

From Drop Box


Now let me show you the dimension of the second rib became 119.7mm, very much closed to the size we need.

From Drop Box


But if you think we are there now, then you are wrong again!

Since bellows is not made by air, it got thickness, some people quit making bellows themselves just because they can't find material thin enough, bellows is too thick squeezing into camera body.

My material produces 0.25-0.3mm thickness when 3 layers combined, and two sides makes 0.5-0.6mm space occupied, so if you are happy with 119.7mm, thinking that is good enough for 120mm, then at final your bellows only got 119.2mm in the best situation, most of time you get merely 118.5 max.

That is fine to you? well, not me.

I can not tolerate letting negative space wasted even 0.1mm in length, it is so precious.

So here we go on next step, give them more spaces.

Stretch green shape 1mm downward,
From Drop Box
and move triangles align the down edge.

From Drop Box


Now the edge size for 2nd ribs becomes 120.7mm, enough for opening and layer thickness. In many cases, I will leave 2mm more for it, a bigger opening is better than a smaller one.

From Drop Box


Now you are making a bellows that really fit your need!

Inspired by green shape, blue shape also stretch 1mm, upward. Then rotate blue shape, align the base line of triangles, meet the first triangle's tip. For showing their relations more clearly, I take off the color of two shapes, instead of colored frames. Here you will notice that two shapes intersect with each other on border.

From Drop Box


Then copy green shape with triangles to other side of blue shape.

From Drop Box


Copy again, this time the blue shape with triangles to other side of green shape.

From Drop Box


There we are, guides for four sides are finished. Based on these guides, we are now connect each tip into a rib.

From Drop Box


finish all the ribs, and now we are almost done.

From Drop Box


You can check each side's dimension, to see if they fit your need.

From Drop Box


Then now comes the final step, spaces between the ribs. For bellows at 4x5 format or smaller, 1.2~1.5mm space is acceptable, use the spacing option or outline option in graphic program, you can easily adjust spaces between these ribs, then they are done, ready for plotter.

From Drop Box


From Drop Box


Now I need rest.

Bellows in shape

There are three most important measures you need to know before making bellows.

1. the opening size of front/back frame.
2. the rib width.
3. the length when bellows totally unfolded.


As for a bellows for 4x5 format, the back opening should be 90x120mm in standard size, but sometimes it changes a little bit, depend on the cameras, there always a frame pasted on it, to fix the shape and fix the back into back stand of the camera body.

I choose 95x120mm as back size in my Polaroid 110B conversion project.

And the front opening, depend on the front frame. The frame, with a round for lens to go through, and four tiny hole for screw, to fix to the front stand. For those old folders, there always no screws for the frame, just used glue.

In the pictures below, you can see one of my favorite folder- Kodak No.1 special, and a bellows tear from 110A. folder had been replaced old ragged bellows into my silk one, shows its quality under the sun.

From Drop Box


Now as an example, let's assume the rib width is 7mm, and the length of bellows is 140mm when totally unfolded. Measure your front and back opening sizes, and draw them in graphic program, I use CorelDraw if you asked, thank you. In this example, the front/back frame will be 60x67mm, 95x120mm.

From Drop Box


Then add the rib size for them, 7mm in rib width is common for most bellows under 4x5 format, remember to chamfer on each corner. Outer size now became 74x81mm, 109x134mm.

From Drop Box


If you ask me why it is 7mm in width? Then it relates to trigonometric function I guess. You see, the width of bevel edge comes from the sum of the square of two other sides as in pictures below, nearly 10mm, very easy to draw for the days when all things need to be done in hands, that's why.

From Drop Box


Now connect the outer edges of the two correspond sides of front and back opening, form a ladder-shaped, you need two of these, showed in green and blue color in picture.

From Drop Box


then turn the horizon one into vertical, and right-aligned with the other. For next step, two shapes meet each other with their end points.

From Drop Box


Using the meeting point as center of circle, draw a circle, radius is what your bellows' length, in here, radius is 140mm.

From Drop Box


Then stretch two ladder-shape to left, make their side extended just as long as radius of the circle.

From Drop Box


This ensures that two ladder-shapes will have the same length in bevel side. You can skip this if the bellows got the same size of front/back opening.

Now the time to draw ribs.

We set this bellows in 140mm in length, so we draw 10 circle side by side, from the tip where shapes meet to the end of big circle, in 14mm diameter.

From Drop Box


And then change circle into rectangles.

From Drop Box


all we need is half part of these rectangles, cut the upper half, then we rotate them, align the edges of the shape.

From Drop Box


From Drop Box

bellows in silk

I made bellows for folders many years, the material I use are light proof nylon cloth for covering, cutting sheets as ribs, and cotton cloth for inner. I am not happy with the quality and the touching feeling of the nylon, but before other light-proof material and thin enough and affordable can be found, I had to live with it. It is the only layer that mask almost light out of the bellows, of course ribs can do the rest job.

Recently I changed my point of view. Since bellows is made by 3 kind of layers, to mask all the light, then I can use any material that is thin enough to make, as they block the light out when 3 layers are merged.

Acrylic paint, that is the key.

Before the layer merged, brush few times the paint on it, block all pin holes in cloth, check it under the sun, till it became opaque all over.

That widen my choice of the material, now I choose silk, because I can find many silk sheets in beautiful patterns, and they will shine under the sun.

From Drop Box


And the ribs, those little ribs keeps people trying to make bellows themselves, all the references I can find, instructed people to cut the ribs one by one by hand, carefully measured, and then pasted them one by one by hand, to the cloth, just imagine the job and time you need!!

Cutting sheet, that broadly used for shop sign, is what I use to as ribs, they can be cut by plotter, very accurate, and self adhesive on one side, so cutting was replaced by computer, and pasting ribs can be done in one minute, all in one time!

And because I replace the job from hand by computer, a graphics program is needed. the pattern is changed, ribs are all pointed angles at sides, compared to traditional way, there are two sides of ribs in rectangle shape.

From Drop Box

Sunday, June 21, 2009

Linhof Technika 5x4 Field Camera Bellows Replacement Instruction

This is an article I wrote about 6 years ago, for I tried to sell bellows on eBay, and for buyers to know how to replace their own bellows, I created this and posted on somewhere. Now I got my own blog, so I collect it here.


Linhof Technika 5x4 Field Camera
Bellows Replacement
Instruction


From Bellows replacement


Bellows Made by Daniel Chiang-Chia-Lung
Written/ Edit/ Drawing/ Layout/ Design by Daniel Chiang-Chia-Lung
email: clc16888@yahoo.com.tw


1. Push bellows back into the case, make it in minimun length.


From Bellows replacement


2. At the back of the camera, take off the Ground Glass Back, place it aside.


From Bellows replacement


3. Inside the back of the front standard, un-screw four screws. Now bellows should be easily separated with the front standard.

From Bellows replacement


* Carefully keep these screws, better gather them with a magnet.

4. Turn Rotate Back 45 degree,

From Bellows replacement


5. Un-screw four Screws with screwdriver.


From Bellows replacement


6. Push the slider out half way.


From Bellows replacement


7. Then separate the Rotate Back from camera, place it aside.


From Bellows replacement


Now take out the Back Standard, and turn it making bellows facing up.

* Carefully not push the slider out too much, otherwise small spring plate insided will fall out.

8. Un-screw all the screws for latches and the back side of the bellows.


From Bellows replacement


Now bellows should be able to separate from the Back Standard.

9. Cut the Front Panel from the old bellows with small knife.
Clean any lasting adhesive or bellows material on the Panel, with sandpaper or alcohol if necessary.

* If you want to make up paint scratches or chips on the panel, use matte black paint spray, or with a black Speedy Marker as well.


From Bellows replacement


10. Make sure the panel is facing up (where inner circle has extruded edge )
With 5mm Double Sided Sticky Tape, stick two edges of the panel, cut them into bevel shape, but don’t tear off the upper waxed paper right now.


From Bellows replacement


11. Place the Panel into the front side of the new bellows, carefull adjust the panel, makes four edges fit into the first fold of the bellows.
There should be a pair of the bellows edges were with ONE fold outside the panel, and another pair were with TWO folds, like the picture shows.

Take off the waxed papers on the Double Sided Sticky Tape, firmly stick the two side of bellows on the panel.


From Bellows replacement


12. If the bellows is extended into the inner circle, cut them off with knife.

Unfold the other two edges of the bellows, With Double Sided Sticky Tape, stick the other two inner edges of the bellows.

Take off the waxed papers of the tape, and fold back, firmly stick on the panel.


From Bellows replacement


13. Cut any part of bellows that extend into the inner-circle.
Finished front panel should looks like this.


From Bellows replacement


14. Place the bellows into the Back Standard.

Be certain your Back Standard and bellows are all in the right direction.
* Back Standard’s top side is the egde where engraved with “West Germany” and “D.P.E.” * Bellows’ under side is where seam exists.


From Bellows replacement


15. Place all four edge plates into the last fold of the bellows, which has black velvet layerd. Screw back all the screws.


From Bellows replacement


16. Make sure all back edges of the bellows are well placed beneath the steel plate, check it while you screw. The situation on the right side of the bellows in picture should not happen.


From Bellows replacement


17. Reverse the step 7, 6, 5, 4, 3, 2, then you now got a brand new bellows.


From Bellows replacement


Any Questions? please don’t hesitate to ask, my email: clc16888@yahoo.com.tw

Enjoy it!