Thank you guys, fund for ordering parts is reaching my need, and for the cameras you send to me, I can begin to convert on Oct, so we should manage to ship the converted camera back to you in Nov.
Thanks again! I won't let you down!
Daniel
Tuesday, September 29, 2009
Sunday, September 27, 2009
Bring Byron to Tibet?
I don't know how this camera handling the cold weather, but I am happy to know someone will travel with it there.
It brought me some thought in mind, how this camera be identified? Yes it is made for snap shooting, but since the format, you can't really treat it as a bigger M6 or Mamiya M7. I personally found it is a good start to bring big format back to people, to city, and to daily lives. There is one Technika IV lying in my cabinet, which I used it for landscapes and studio portraits, but never a chance to people on street, that initialed my Byron conversion project.
I think it is not quiet the same concept as Press camera, those pressmen used for news 60 years ago, they used strong flash, they cropped a lot, and their final print in low quality newspapers...., that's why I thought Byron is hard to be identified now.
But now it show some advantages, fitted for traveling, pack light, camera weighted below 1kg, and with 3 lens, managed within 2.2kg range, the one who will carry it to Tibet planning shoot some 4x5 and 6x12, I wish him all the best!
Monday, September 21, 2009
Friday, September 18, 2009
at seashore

Byron+Schneider SA 8/90 + red filter+ Tri-X 4x5

Byron+Schneider SA 8/90 + red filter+ Tri-X 4x5


Tuesday, September 15, 2009
new design for film back system
Follow want Jack advised before, I change the blocking plate of double-sided holder from a pull-out-push-in into a simply rotating design.
When the plate is rotated to show up, the camera is ready for double-sided holder.
 And when the plate is rotated to hide in the chamber, it is ready for bayonet style holder, like Fuji PA-45, Grafmatic or 120 film holders.
 This way, the camera is need no any parts to be taken off or installed back while changing the film system, no springs, no screws, no gg plates...., just a rotating plate to make all things done! and you wouldn't lost any thing in field.
When the plate is rotated to show up, the camera is ready for double-sided holder.


Sunday, September 13, 2009
Agfa MultiContrast FB paper ISO and ZoneMaster meter calibration
What I used to calibrate ZoneMaster enlarging exposure meter (made by RHdesigns UK), is different with the way written in ZoneMaster manual. Manual said you have to set the exposure compensation, which gained from test stripe, then find out the paper contrast range to set paper ISO.

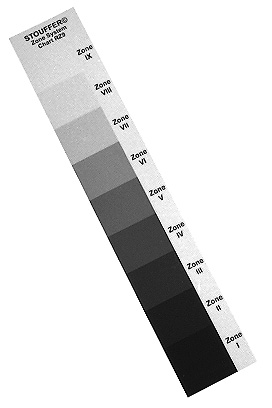
Well to me these sounds complicated and troublesome, I always trying to solve the problem in one shot, so I did it, with help of Stouffer TP-41 4x5 step wedge(looks like they do not produce it anymore, but TP-31 is OK), and ZR9 Zone system chart, on Agfa FB paper.
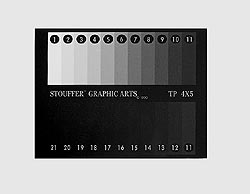
First, I put TP-41 over the meter, with #5* wedge on top of the meter circle. under the enlarger, I measure it and get the reading, it is for mid-grey, so I press the darker button, to push the readout to darkest end of greyscale, it is for ZONE II. According to the readout, I made contact print for each grade, so I got 7 contacts, from #00, #0, #1...#5. for 8x10 paper, it only need two pages of paper to finish all the test.
I developed and processed the paper as usual, then inspected the print under the light. use RZ9 as reference, find out the best match grey scale as Zone II and Zone VIII as on RZ9.
Here is the data I got from prints.
Grade II~VIII Range ISO Offset
#00 #2~16 225 0 **
#0 #5~36 160 0
#1 #6~35 150 -1
#2 #4~29 130 +1
#3 #4~24 105 +1
#4 #4~22 95 +2
#5 #5~18 70 0
take #1 as example, the grey range from #6~#35, totally 30 steps in count, and each step represents Dlog0.05 on TP41, so it means grade #1 paper can handle 0.05x30=1.5 density range on negative, place it between Zone II and Zone VIII, we define it as ISO 150 for this grade.
And since we use step#5 as reference to make the meter, but now it moves to step#6 on contact print, so we need to make exposure compensation -1, to adjust the ZoneMaster meter.

* TP41 got 41 wedges and each one in 0.05 density increments, total 2.0 density range, fully cover the d.range a normal negative will have. using #5 instead of #1 as start point, for leaving spaces for calibration if needed.
** Due the long slope of the grade #00, it is tested by TP-21, which has a logD=3.0 density range. and used #3 as start point. each step on TP21 represent 0.15 density range.
Sunday, September 6, 2009
Contact print with LCD monitor, a tailor made light source for film
Just initial a thread in Large format photography site, about contact print
LCD monitor as VC light source for contact print
The biggest format film I made now is 4x5, not a good candidate for this, but who knows, maybe someday I will try 20x24.
What I am thinking of the contact process need a LCD monitor and a thin piece of semi-matt glass like ground glass.

you scan your developed film in very rough resolution, say 72ppi, just for viewing on monitor, then decide paper grade and pick correspondent RGB values, and make some dodge and burn and grade change in part area, all in soft paintbrush, now this is the light source specifically for this film, it can be saved as a data file.

Now is time for contact print, stack in order 1. monitor 2.light source data file open. 3 matt glass to diffuse pixel. 4.developed film. 5. Multigrade paper.

that's the idea.

complicated? yes for first time, but think of the large format contact print, I mean really big, a tailor made light source for it is worthy doing, especially for those difficult negatives.......
Yes my goal is to build a system that for large format film that do contact print as final output, no enlargement, like those huge size film 20x24. So I am looking a way that can do all the techs that on enlarger.
And not only it copy all the tricks you can have on enlarger, most important part is, it records and plays your tricks again, and again.....
For enlarger, you got light path as space for dodging and burning, you got VC light source to change grade, or area splitting prints......
So in traditional way, you utilize all these tools and tricks in darkroom, struggling to make a perfect print, finally it came out, fit your standard, and now you want to make a second print, you have to do those process again!
explore a way to make a perfect print is an creative challenge, but do the same thing again and again, is a hard labor work.
But if we use LCD monitor as a light panel, and through color control, area intensity control, we can do all enlarger does, all these can be precisely set in digit, and the greatest part is, these setting (color, intensity) can be saved as a file (through image software).
I treat this as a tailored light source specifically for this film.
For the first perfect contact print, you need to play all the tricks, just like on enlarge, struggling to make a satisfying print, but after that, to make a second, third, of even years later you want to make the same print again, just use that light source file, it saves those tedious job for you.
Now is a digital era, but we insist on analog output because it is not replaceable, at least at this time, but we can take the advantage of digital tech, to make the creation process easier and consistent. traceable and has a record to discuss later.
LCD monitor as VC light source for contact print
The biggest format film I made now is 4x5, not a good candidate for this, but who knows, maybe someday I will try 20x24.
What I am thinking of the contact process need a LCD monitor and a thin piece of semi-matt glass like ground glass.
you scan your developed film in very rough resolution, say 72ppi, just for viewing on monitor, then decide paper grade and pick correspondent RGB values, and make some dodge and burn and grade change in part area, all in soft paintbrush, now this is the light source specifically for this film, it can be saved as a data file.
Now is time for contact print, stack in order 1. monitor 2.light source data file open. 3 matt glass to diffuse pixel. 4.developed film. 5. Multigrade paper.
that's the idea.
complicated? yes for first time, but think of the large format contact print, I mean really big, a tailor made light source for it is worthy doing, especially for those difficult negatives.......
Yes my goal is to build a system that for large format film that do contact print as final output, no enlargement, like those huge size film 20x24. So I am looking a way that can do all the techs that on enlarger.
And not only it copy all the tricks you can have on enlarger, most important part is, it records and plays your tricks again, and again.....
For enlarger, you got light path as space for dodging and burning, you got VC light source to change grade, or area splitting prints......
So in traditional way, you utilize all these tools and tricks in darkroom, struggling to make a perfect print, finally it came out, fit your standard, and now you want to make a second print, you have to do those process again!
explore a way to make a perfect print is an creative challenge, but do the same thing again and again, is a hard labor work.
But if we use LCD monitor as a light panel, and through color control, area intensity control, we can do all enlarger does, all these can be precisely set in digit, and the greatest part is, these setting (color, intensity) can be saved as a file (through image software).
I treat this as a tailored light source specifically for this film.
For the first perfect contact print, you need to play all the tricks, just like on enlarge, struggling to make a satisfying print, but after that, to make a second, third, of even years later you want to make the same print again, just use that light source file, it saves those tedious job for you.
Now is a digital era, but we insist on analog output because it is not replaceable, at least at this time, but we can take the advantage of digital tech, to make the creation process easier and consistent. traceable and has a record to discuss later.
Subscribe to:
Posts (Atom)